Online Companion to Wayne’s Poster for Retreat 2016
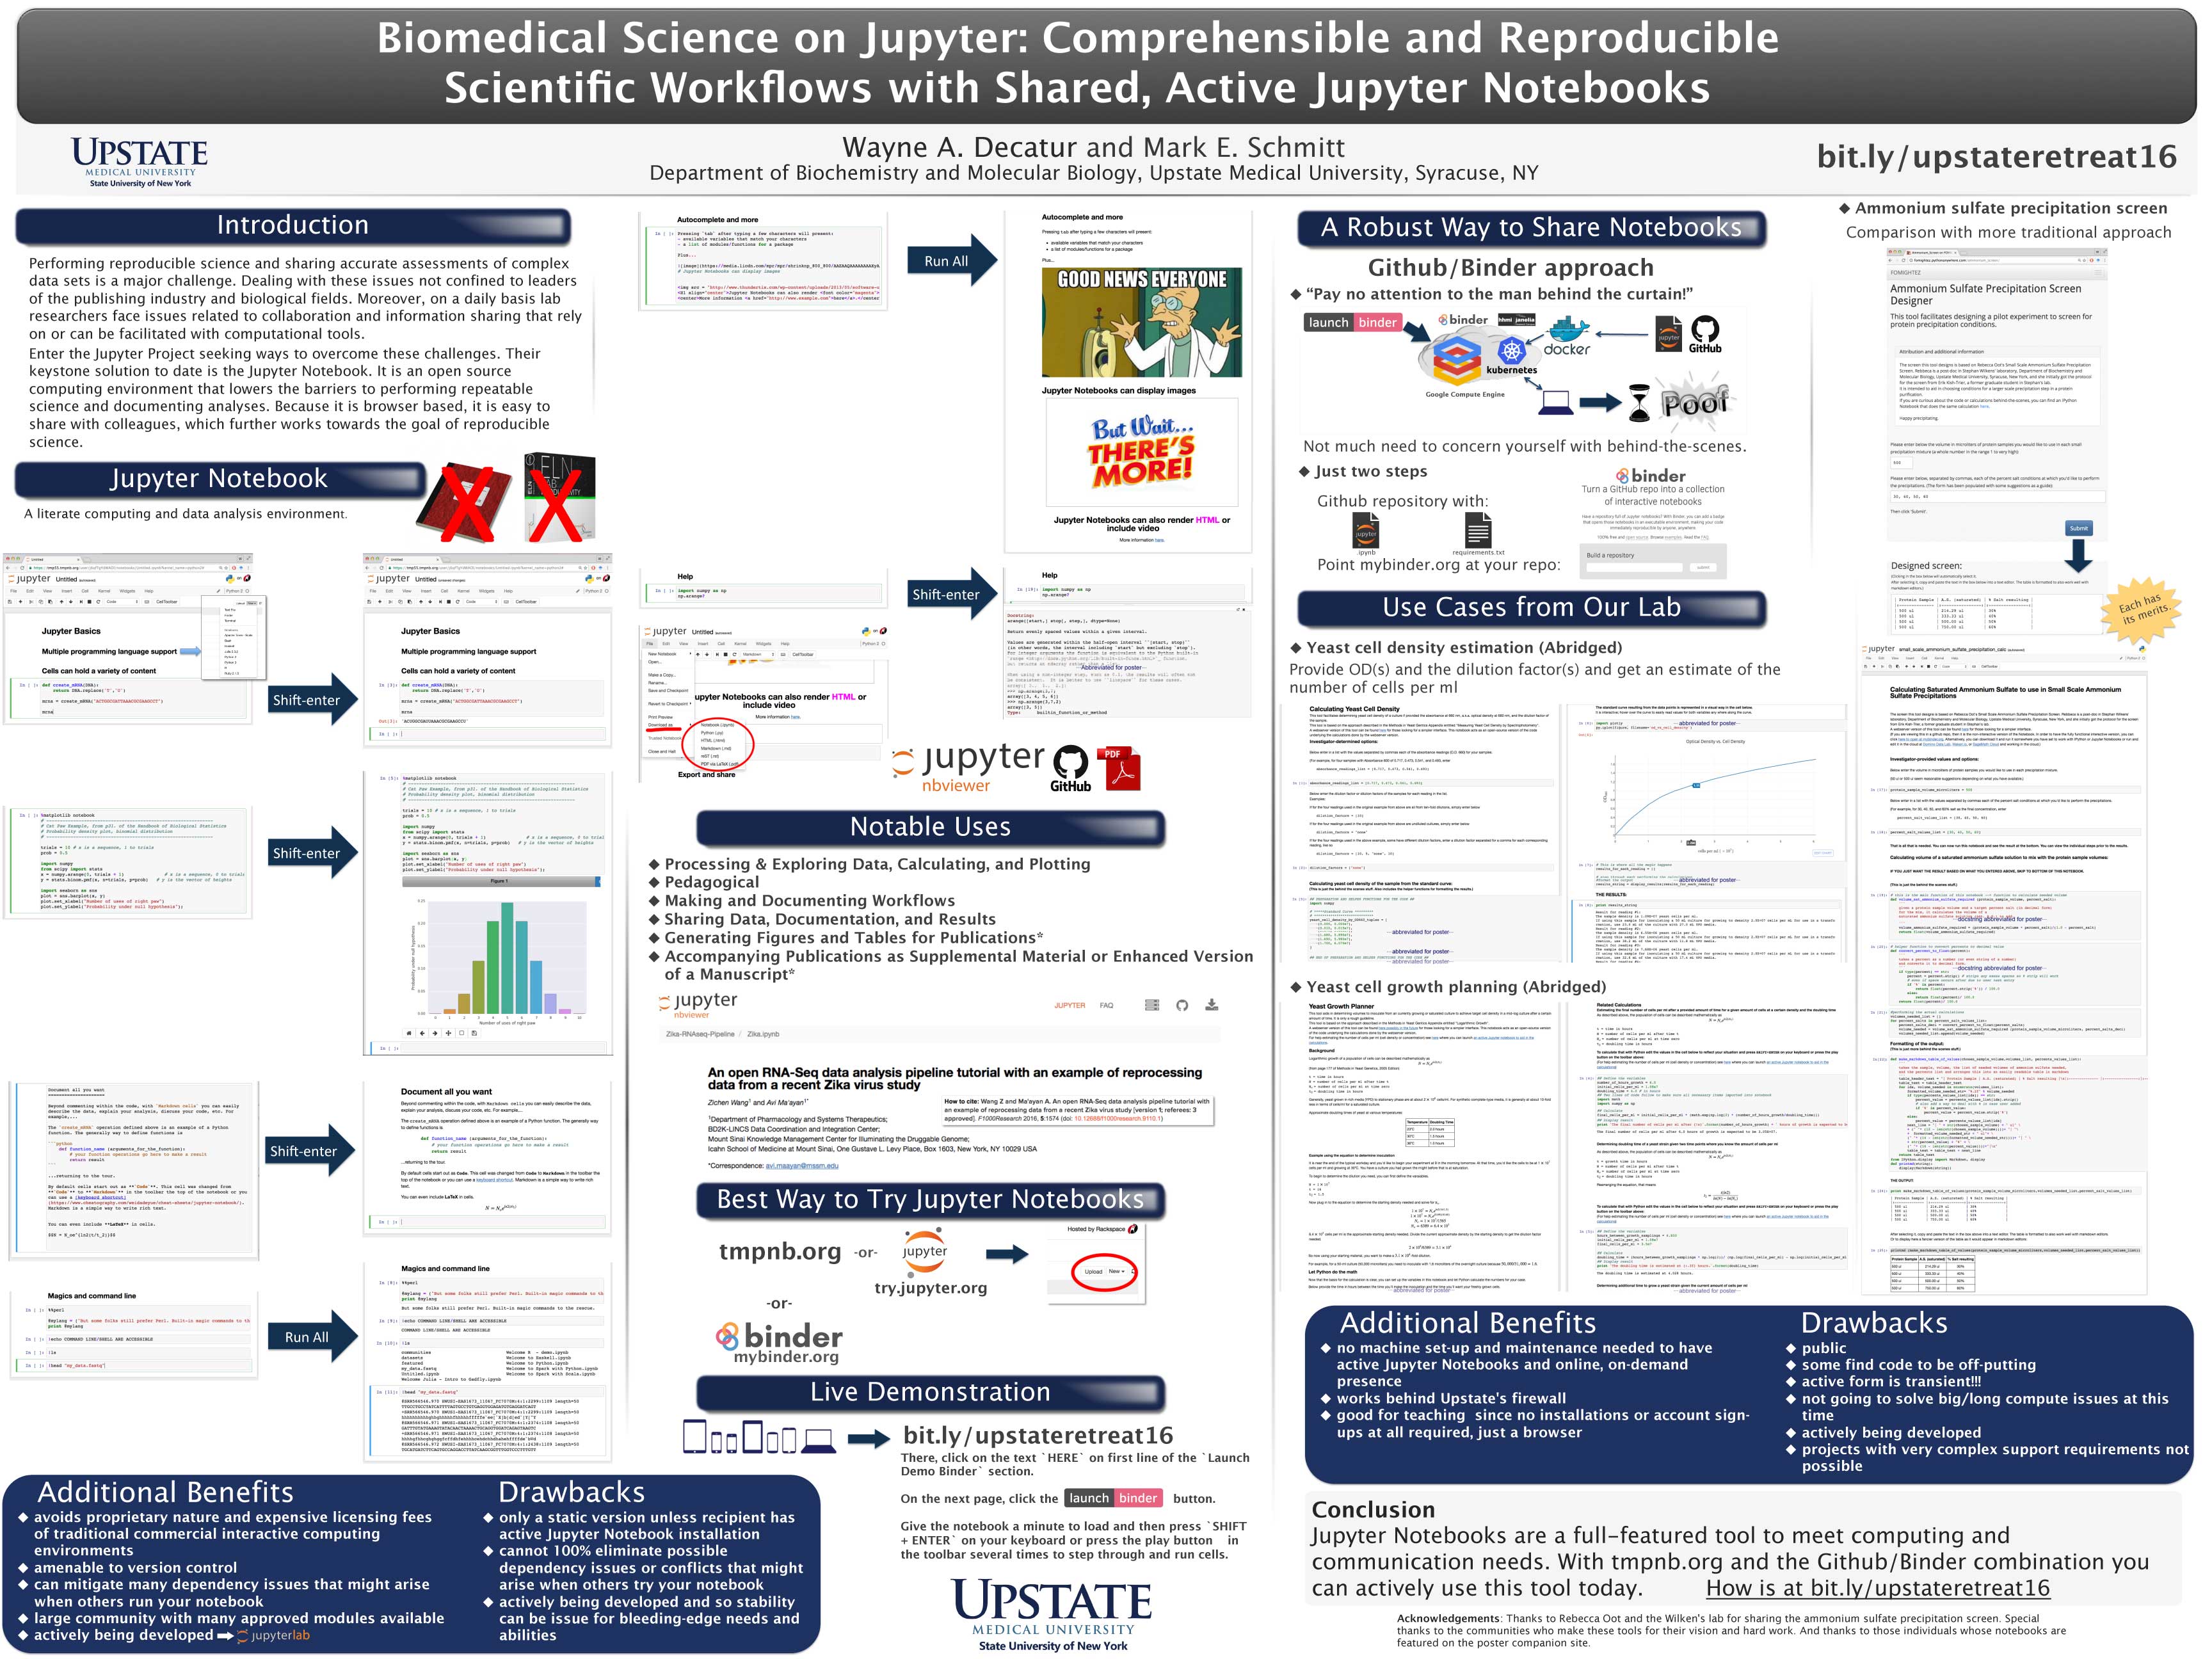
Links and resources for Jupyter Notebook and how to launch shareable active Jupyter Notebooks from a poster presented at Upstate Medical University’s Biomedical Sciences Retreat 2016. Poster entitled: Biomedical Science on Jupyter: Comprehensible and Reproducible Scientific Workflows with Shared, Active Jupyter Notebooks
Launch Demo Binder
Go to an example repository by clicking HERE.
Once there, click on the ![]() button to launch the demo.
button to launch the demo.
Give the notebook a minute to load and then press
SHIFT+ENTER on your keyboard or press the play button in the toolbar
several times to step through and run cells.
The cells that should run will have the In [ ] on the left and they will
become filled with numbers when complete. Several will have viewable
output.
Go back to the repository main page. Once there, click the blue text
that says Decoding translation in the cloud and at....
This will open a rendering of the notebook, but you see all the
In [ ] on the left have nothing between the brackets and none of the
output cells are present.
This is a static rendering of the notebook. We cannot interact with it. If I had saved the completely run notebook, the output would be there but we still would not be able to interact with it. (And so it is useful, but not as useful as an active Jupyter Notebook.)
(A richer version of the static version of the notebook can be viewed here via the nbviewer that will render any Github-hosted Jupyter Notebook. Often this works better for notebooks that have fancy plots embedded that the default Github rendering doesn’t handle.)
This was a very simple notebook that has a good mix of the features as it was meant to touch casually on some molecular biology aspects while introducing the Jupyter Notebook system to some students that visited Upstate.
The repository hosting that Jupyter Notebook can be found
here. To get the
launch binder button to work I had to previously tell the Freeman
Lab’s Binder system found at mybinder.org to
build a binder from that repository at Github. That binder then
becomes available for users to spin up notebooks on-demand, essentially
instantaneously.
Basic Notebooks to Illustrate Use in the Lab
These links will take you to the Github page where you’ll see links to
the static notebooks as well as ![]() buttons to launch the notebooks
as active notebooks using the Freeman Lab’s Binder system found at
mybinder.org.
buttons to launch the notebooks
as active notebooks using the Freeman Lab’s Binder system found at
mybinder.org.
Click the ![]() button at any of the following repositories for an
active notebook:
button at any of the following repositories for an
active notebook:
Notable Notebooks
See the penultimate page of this online documentation for a list of
example scientific Jupyter
Notebooks,
entitled A sampling of scientific notebooks & extensions.
To get there, the easiest way is to click
here
press or Next in the bottom right of each page three times to get to the
page entitled References and Resources to Match Poster Sections.
See that page as well as for the list of example notebooks using the Github/Binder approach.
Essential Resources
Annotated, Essential Resources
Nature’s special collection: Challenges in Irreproducible Research
Interactive notebooks: Sharing the code by Helen Shen. Nature. 2014 Nov 6;515(7525):151-2. doi: 10.1038/515151a. PMID: 25373681. This article is a couple of years old now but gives a good background on the issues and impetus for now what are Jupyter Notebooks.
How Jupyter Notebooks Will Improve Your Computational Life - a nice illustrated introduction to Jupyter Notebooks
IPython Notebook/Project Jupyter Half day Workshop
“Project Jupyter is a literate data analysis environment (similar to knitr and Shiny) that supports over 40 different programming languages, including R and Python both. It can be used to build reproducible analyses for publication, collaborate over distances on data analysis, and build interactive tutorials and homeworks around data analysis.”
A gallery of interesting IPython Notebooks, in particular see Reproducible academic publications section . Some other notebooks are highlighted here.
Installation, Configuration, and Usage - start here if you need a solution not provided by tmpnb.org or the Github/Binder combination; the site will suggest the Anaconda distribution of Python associated environment as the easiest route for installing Jupyter Notebooks. Alternatively, if you rather easily work in the cloud and not be linked to one machine, I suggest a SageMathCloud account as it is the only option I can confirm works on Upstate’s network due to campus firewall. Domino Data Lab and Wakari.io are other places that offer a place to develop Jupyter Notebooks in the cloud but last time I checked their implementation was incompatible with Upstate’s network.
Introduction to Applied Bioinformatics (or IAB) is a free, open source interactive text that introduces readers to core concepts of bioinformatics in the context of their implementation and application. - uses Jupyter notebooks and mybinder.org
Exploratory Computing with Python - a collection of notebooks helpful for learning Python and illustrative of the exploratory computing aproach
“Lots of books are written on scientific computing, but very few deal with the much more common exploratory computing (a term coined by Fernando Perez), which represents daily tasks of many scientists and engineers that try to solve problems but are not computer scientists. This set of Notebooks is written for scientists and engineers who want to use Python programming for exploratory computing, scripting, data analysis, and visualization. Python makes many of these programming tasks quick and easy and, probably most importantly, fun.”“
Freeman Lab’s MyBinder.org site - where you’ll go to point their system at your Github repository with a Jupyer Notebook to make active notebooks available online
Is mybinder 95% of the way to next-gen computational science publishing, or only 90%?
“The split that my lab has made here is to use a workflow engine (e.g. make, pydoit, or snakemake) for the compute & data intensive stuff, and then feed those intermediate results (assembly and mapping stats, quantification, etc.) into analysis notebooks. For mybinder purposes, there should be no problem saving those intermediate results into a github repo for us and everyone else to analyze and reanalyze.”
tmpnb.org or try.jupyter.org - launch active, transient Jupyter Notebooks in the cloud for basic development, see Instant Temporary IPython Notebooks
Poster
References and Resources to Match Poster Sections
Background
Nature’s special collection: Challenges in Irreproducible Research
-
“In spite of much recent interest in many scientific areas, emphasis remains more on procedures, strictures and discussion, reflecting the inexperience of most scientific journals when it comes to software…”
A statistical definition for reproducibility and replicability
“In spite of much recent interest in many scientific areas, emphasis remains more on procedures, strictures and discussion, reflecting the inexperience of most scientific journals when it comes to software…”
Why scientists must share their research code in Nature News.
Interactive notebooks: Sharing the code by Helen Shen. Nature. 2014 Nov 6;515(7525):151-2. doi: 10.1038/515151a. PMID: 25373681. This article is a couple of years old now but gives a good background on the issues and impetus for now what are Jupyter Notebooks.
How Jupyter Notebooks Will Improve Your Computational Life - a nice illustrated introduction to Jupyter Notebooks
IPython Notebook/Project Jupyter Half day Workshop
“Project Jupyter is a literate data analysis environment (similar to knitr and Shiny) that supports over 40 different programming languages, including R and Python both. It can be used to build reproducible analyses for publication, collaborate over distances on data analysis, and build interactive tutorials and homeworks around data analysis.”
A gallery of interesting IPython Notebooks, in particular see Reproducible academic publications section . Some other notebooks are highlighted here.
Ten Simple Rules for Effective Statistical Practice
“Modern reproducible research tools like Sweave [18], knitr [19], and iPython [20] notebooks take this a step further and combine the research report with the code. Reproducible research is itself an ongoing area of research and a very important area that we all need to pay attention to.”
Jupyter Notebook will evolve next into a platform that will still run in the browser but expose more interface functionality while including more, full-featured notebooks, see here to see what is planned in the next couple of years as they roll out JupyterLab. Additionally, JupyterHub is being developed to serve multiple persistent, authenticated Jupyter Notebooks for teaching and collaborative uses; see slide 21 here as a guide to when you may need what implementation.
A sampling of scientific notebooks & extensions
Developments in next generation sequencing was plotted using a notebook
LIGO folks published a Python notebook along with the data to explain their analysis and findings (plots, audio files). and a few hours later you can now use Binder to bring up Jupyter with that notebook and all the dependencies preloaded, and step through their analysis yourself
Bioconductor’s RNA-seq Workflow in Jupyter notebook format with related video here with making-of described here
Exploratory bioinformatics with plot.ly and IPython notebook: Visualizing gene expression data features using a high-end plotting interface with bioinformatics data
Introduction to Applied Bioinformatics (or IAB) is a free, open source interactive text that introduces readers to core concepts of bioinformatics in the context of their implementation and application. - uses Jupyter Notebooks and mybinder.org
Exploring proteomics data from TCGA/CPTAC breast cancer samples as described here
Dynamics and associations of microbial community types across the human body, by Tao Ding & Patrick D. Schloss. Notebook replicating results
Indication of family-specific DNA methylation patterns in developing oysters, Claire E. Olson, Steven B. Roberts doi: http://dx.doi.org/10.1101/012831. Notebook to generate results in the paper.
Transcriptome Sequencing Reveals Potential Mechanism of Cryptic 3’ Splice Site Selection in *SF3B1*-mutated Cancers by Christopher DeBoever et al. There are several notebooks to replicate results and make figures.
A Reference-Free Algorithm for Computational Normalization of Shotgun Sequencing Data, by C.T. Brown et al.. Full notebook
The Broad Institute built an extension for working their GenePattern platform from within a Jupyter Notebook environment
Be sure to look at the list of example notebooks using the Github/Binder approach below as well.
Resources for Running Active Notebooks in the Cloud
Freeman Lab’s MyBinder.org site - where you’ll go to point their system at your Github repository with a Jupyer Notebook to make active notebooks available online
Is mybinder 95% of the way to next-gen computational science publishing, or only 90%?
“The split that my lab has made here is to use a workflow engine (e.g. make, pydoit, or snakemake) for the compute & data intensive stuff, and then feed those intermediate results (assembly and mapping stats, quantification, etc.) into analysis notebooks. For mybinder purposes, there should be no problem saving those intermediate results into a github repo for us and everyone else to analyze and reanalyze.”
tmpnb.org or try.jupyter.org - launch active, transient Jupyter Notebooks in the cloud for basic development, see Instant Temporary IPython Notebooks
I have made a page to walk you through trying tmpnb.org or try.jupyter.org, find it here.
- Another alternative is to click here. I have not extensively run this site through it’s paces, and so I can offer a couple points about it and beyond that your mileage may vary. It was set up by the excellent Domino Data Lab to serve as a place to run an active notebook about differences between Python 2.x and 3.x without need for signing into the Domino Data Lab service. I know the free tier for signed in users is limited to 15 minutes, and so maybe the anonymous one also has this limitation as well? Also similar to tmpnb.org unless it is already installed, you won’t have access to other modules or be able to scrape data from other sites.
The Binder/Github set-up allows you to designate other modules you need loaded when the instance is spun-up, but that does mean some set-up steps as discussed in the appendix. Contact me if you need help understanding how to set this up.
Launching Active Versions of My Notebooks
Click the ![]() button at any of the following repositories for an
active notebook:
button at any of the following repositories for an
active notebook:
Ammonium Sulfate Precipitation Screen Calculator
The Cell Density Estimator where only a single sample is analyzed may be easier for novices to follow, and an active notebook can be launched here.
Notebook designed as an active computing exercise for young students visiting the lab
The example notebook used for the introduction section of the poster can be found here
Contrast the transparency of the
Ammonium Sulfate Precipitation Screen Calculator with a form-based
Django site that performs same calculation
here.
Other Noteable Notebooks Using Github/Binder approach
- Molecular Design Toolkit
Demo - after
hitting the
 button there I suggest the early parts of the
Example 1. Build and simulate DNA.ipynbandExample 3. Simulating a crystal structure.ipynbnotebooks. - nglview is a Python package
that makes it easy to visualize molecular systems, including
trajectories, directly in the Jupyter Notebook. (Launch a Binder by
clicking the
Binderlogo there.) See more about nglview here. - VPython - Visual Python
demos has a
button at the bottom. Try
Atomic solidfor a simulation of interatomic interactions. - Introduction to Applied Bioinformatics (or IAB) is a free, open source interactive text that introduces readers to core concepts of bioinformatics in the context of their implementation and application.
- ** the LIGO notebook is most famous Jupyter Notebook presently, and it is available in active form** - LIGO folks published a Python notebook along with the data to explain their analysis and findings of gravitational waves and you can now use Binder to bring up Jupyter with that notebook and all the dependencies preloaded, and step through their analysis yourself
Appendix: Using tmpnb.org or try.jupyter.org
Get an active notebook running
- Go to tmpnb.org or
try.jupyter.org and you’ll see a
dashboardlike below.
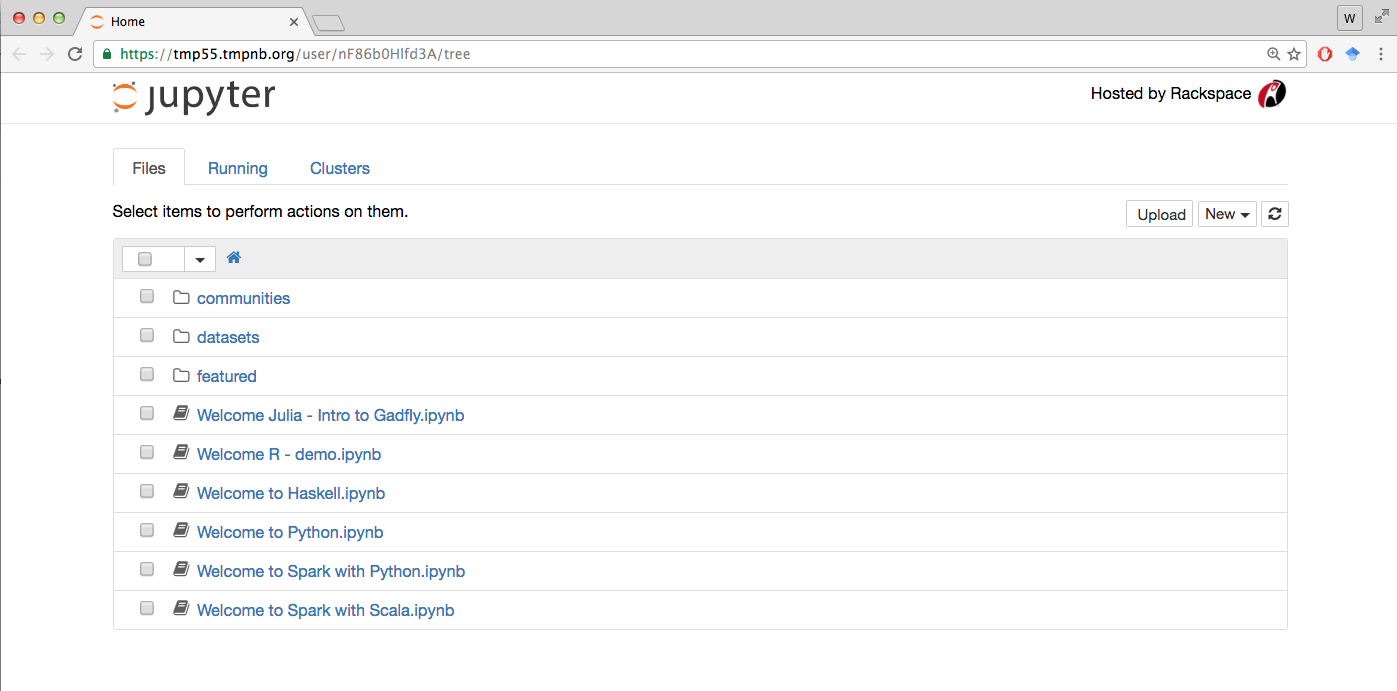
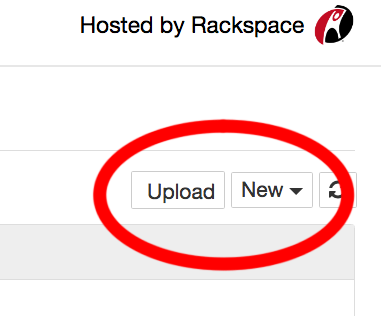
- If you already have a notebook file, click
uploadon the upper right side of the dashboard, and then point the browser at your file.
Click okay and then the notebook will show the name of your file at
the top of the dashboard. Click the upload button next to that
to actually upload.
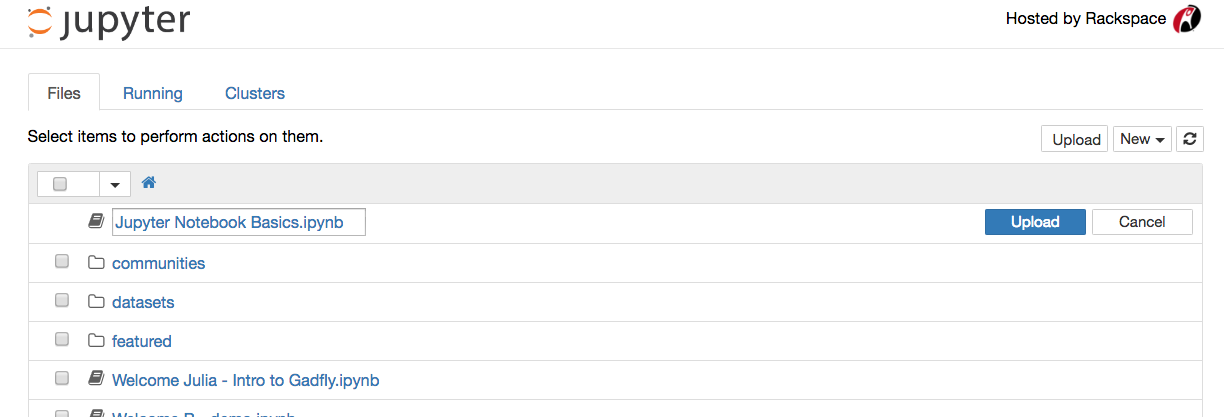
Once uploaded, click on it in the list of notebooks to launch.
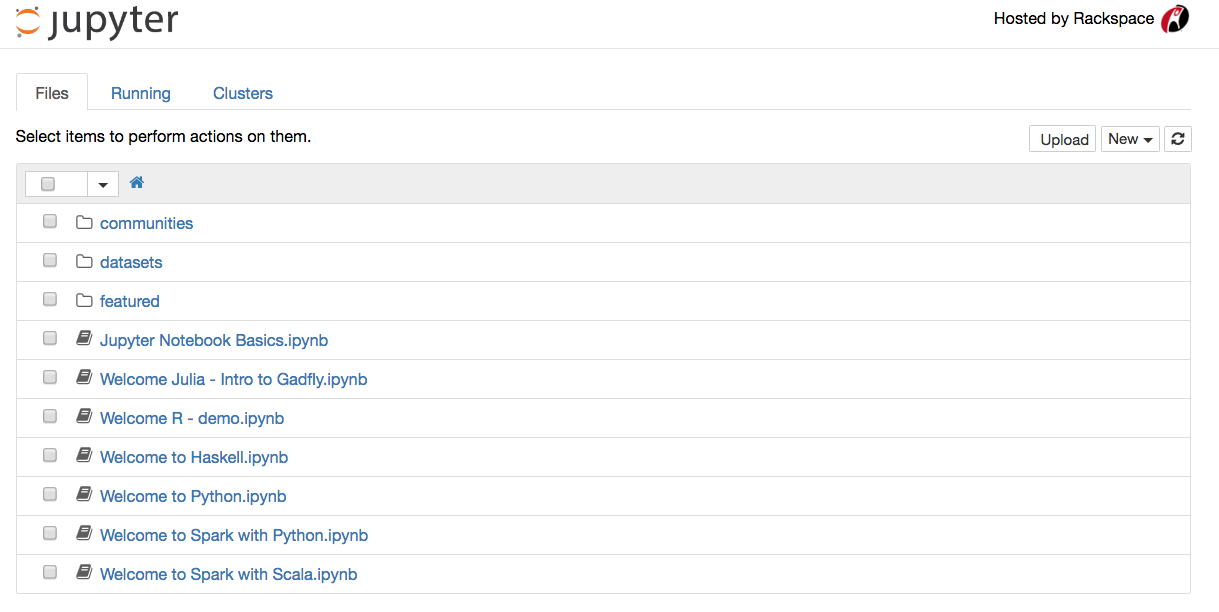
In the example above, the uploaded notebook
Jupyter Notebook Basics.ipynb is now ready to be clicked on to
initiate launch.
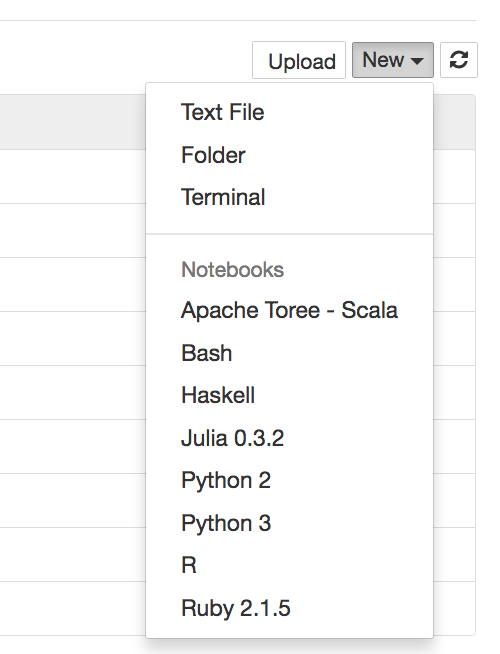
- If you have no notebook, select one from the list or click
Newand choose your language option.
(You can acquire notebook files from many sources that you could then upload for active use using the process outlined above. Several of such sources can be found by finding the Github accounts linked to the notebooks referenced here.)
Try the notebook
- Tips
- hit
shift-enterto run a cell. - the pull-down menu in the toolbar lets you switch cells from
codetomarkdownbut there are also short-cuts. - Fom inside the notebook you can always return to the
dashboardby clicking the Jupyter logo in the upper left side.
- hit
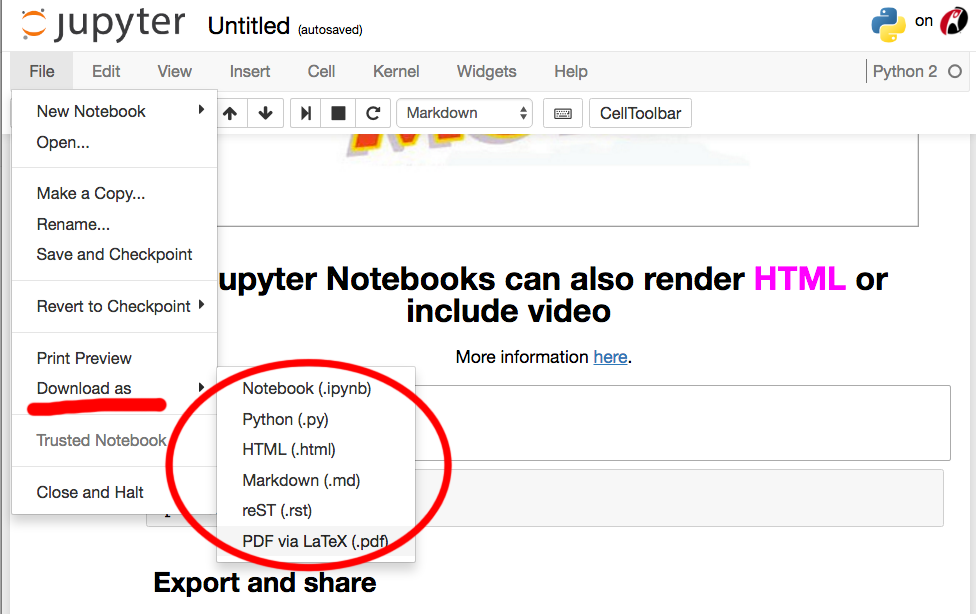
- REMEMBER THE ACTIVE FORM IS EPHEMERAL. If you did anything that
you are happy with, be sure to save it locally by going to
File>Download as>Notebookand saving the file on your drive. Later you can use theuploadprocess covered in the first part above to resume using it as an active notebook.
Appendix: Making your first Binder
Preparation
Obtain a Github account if you don’t already have one
Items to make in preparation
a Jupyter Notebook. Only absolute requirement.
I suggest developing inside a notebook spawned from someone else’s Github/Binder combination or tmpnb.org, see here. Save often and local. Or simply copy an example notebook for testing. Notebooks end in the
.ipynbextension.requirements.txtfile to specify dependencies.See step #2 at http://mybinder.org/. (Technically, not absolutely required if your needs don’t extend beyond basic Python or if mybinder.org already has the needed module installed. For example, when I looked into
bokeh, they already had it. The availability of modules can be confirmed by typingimportfollowed by the module name [or what designation is used to import that module usually] in a notebook spawned via MyBinder. If there is no error, than it is already available and you don’t need to add it torequirements.txt. Alternatively, there are other way to specify dependencies, see the site.)
Readying your Github Repository
Upload the Jupyter Notebook file to a repository at Github.
If needed, add the
requirements.txtfile to the repo to point at pypi modules needed. See step #2 at http://mybinder.org/Copy to your clipboard the URL address of your repository. It will resmble
Point my binder at your Github Repository
- Go to the mybinder.org site.
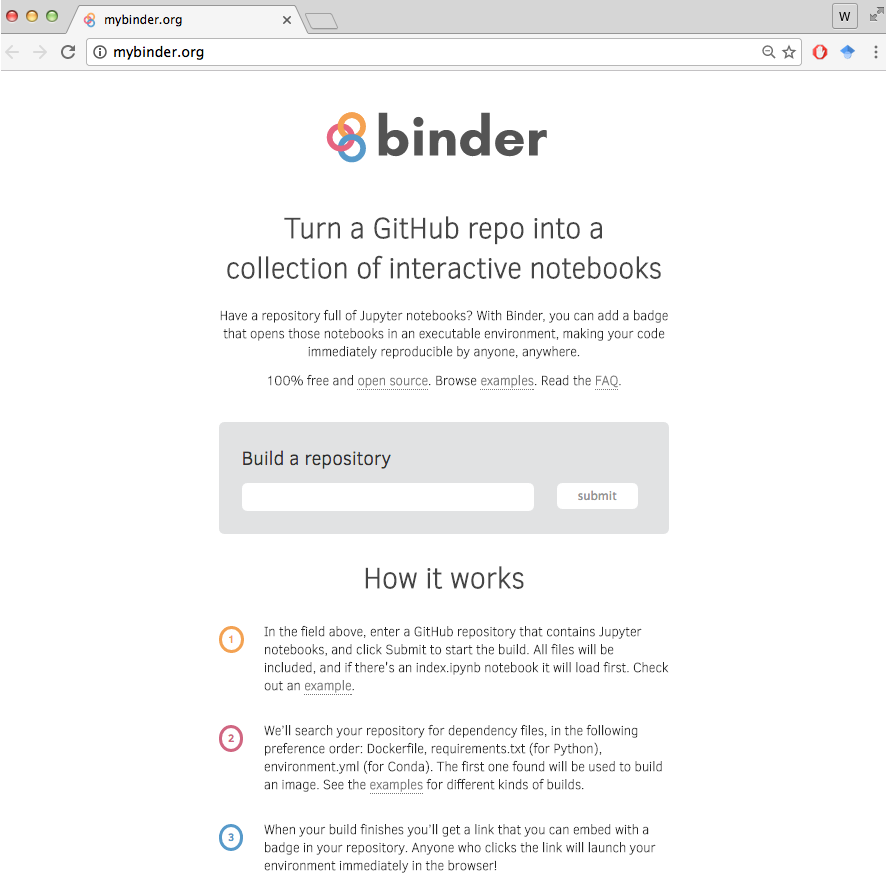
- Paste the address if your Github repository in the space next to the
submitbutton.
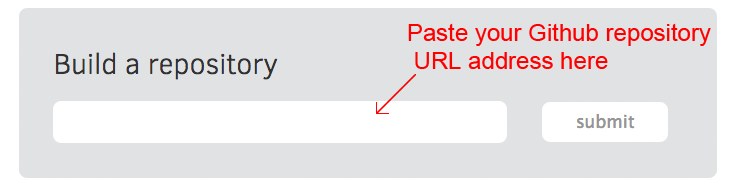
- Press
Submitto initiate the build process.
** It will then look something like this as it starts building the launchable Binder version of your repository.**

- Let it process. Only when all three dots on the left side turn green is it built, like below.
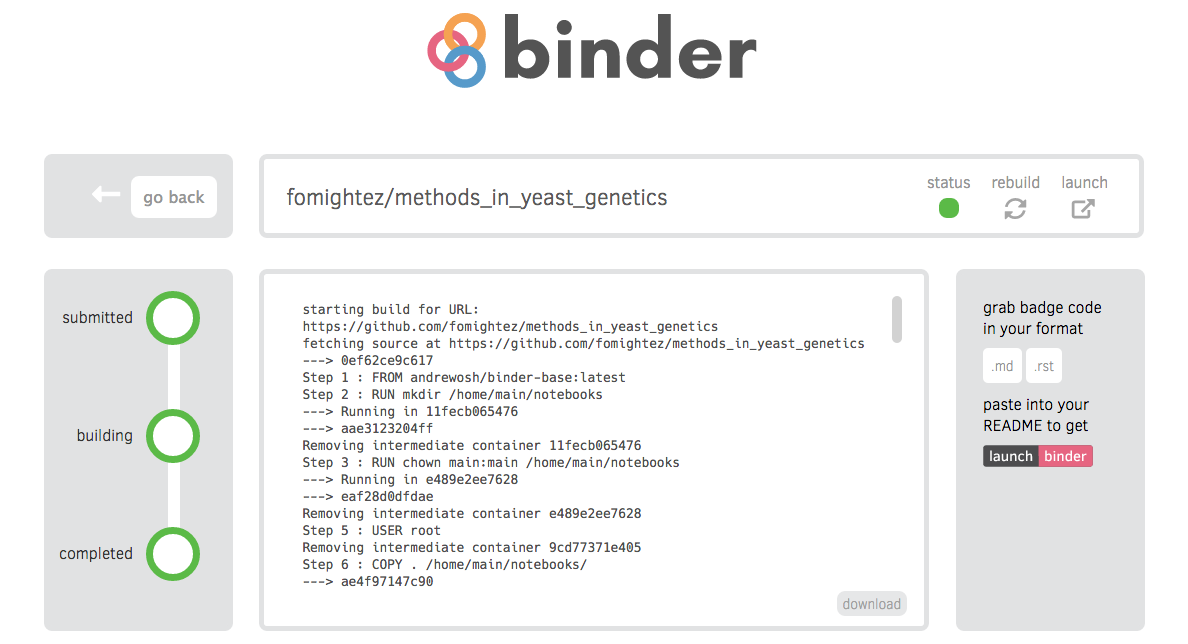
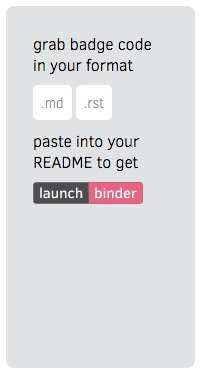
- Grab the code for your launch button badge. They have markdown and restructured text versions available right there.
The launch badge button is just an image linked to an html link that will trigger deploying of your notebook immediately on-demand via mybinder.org. Because the link conforms to a certain convention, you can also build it yourself later. The link to trigger launching an active form of your notebook will look like:
http://mybinder.org/repo/user_name/repo_name
-or-
http://mybinder.org/repo/user_name/repo_name/notebooks/specific_notebook.ipynb
You can easily get the code for the badge button off the build page or
edit someone else’s links to point at yours. For example, you can use my
text here to make badge
buttons and/or links to your launchable notebooks. (Click the raw button to see the raw code for copying.)
This is what the launch button badge looks like —> ![]()
- Paste the
launch binderbutton code in your README.md at your repository or put the link elsewhere.
Use your Binder
Test by launching an active notebook using the links and/or
launch binderbutton badge.The active notebook should launch close to immediately (within several seconds) and you’ll be ready to go.
Share the link with others or point them at the site of the button.
\ Sort by:\ best rated\ newest\ oldest\
\\
Add a comment\ (markup):
\``code``, \ code blocks:::and an indented block after blank line